
Online sign ups simplify organizing for your event, so you can focus on making it a success. SignUpGenius also helps streamline your communication, offering several easy ways to send messages to participants.
After all, organizing takes some level of communication. That’s why we’ve developed some helpful tools that simplify communicating with your participants and attendees. These four features will help you share the latest information about your event and keep track of your engagement.
To get started, you’ll need to invite your sign up participants to opt-in to receive text messages. First, log in to your account and click the Messages icon on the left side of the Sign Ups account page. Once you hit the Compose option, click on Text Message. You can then send an email that will invite people in your group to opt-in to text messages.
Your group participants will receive an email with a button that takes them to our site. They’ll enter their mobile phone number and submit if they’d like to receive texts. If participants don’t enable texts, they will receive your event updates by email.
Follow these easy step-by-step instructions to send text messages about your event.
.jpg)
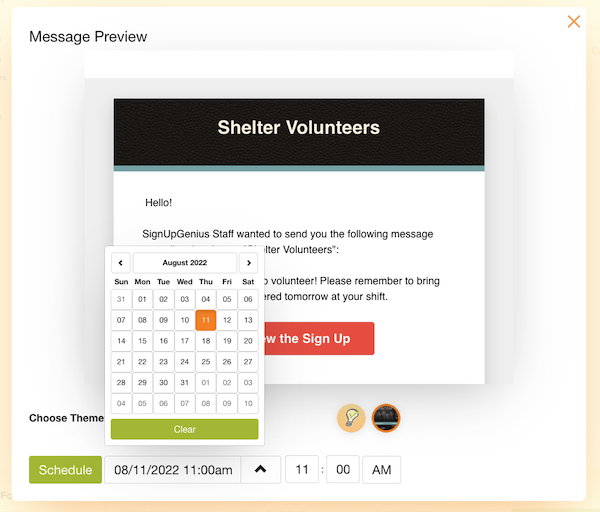
Start by clicking the Messages icon in your account. Then, select the Compose tab and compose your message. You can choose to schedule the message to an existing group of email addresses or you can import your group or manually enter the email addresses.
Email messages always contain a link to the related sign up(s). You can choose individual sign ups, or multiple sign ups that are either in a tab group, on your account index page - which lists all active sign ups. If you have an Enterprise plan, you can also select a specific portal page.
Once you have composed your message, select the “Preview & Send” button to preview your message before sending it. On the preview screen, select the option to schedule messages to send at a specific date and time. Your message will now be scheduled and can be seen in the Scheduled tab in the messages area of your account.
To compose a custom email template, click the Messages icon in your account and under the Compose tab, select the option to create an Email Template. Once you have composed your template email, you can attach documents, if needed, and assign the message to a sign up. Keep in mind that you will need to publish a sign up in order to assign the template to it.
You can create customized emails to communicate additional information to your client or participants. You can include a custom message, a link to a website or even an attached form. The email will be automatically generated upon sign up or in the reminder email — depending on what you have selected.
This video tutorial walks you through the simple steps of customizing confirmation and reminder templates.
.png)
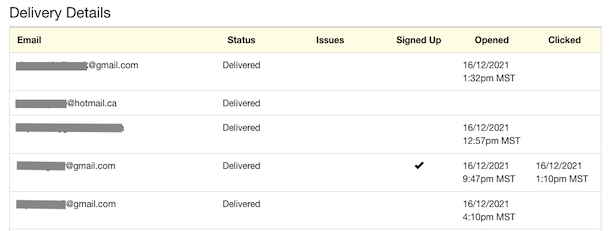
Click Messages on the left side of your account page. On the Dashboard tab, you will see a log of Recently Sent emails. Click the Stats icon to the far right of a row to access Message Details to view the text of the email, and Message Analytics to view Delivery Details. A few steps you can take if an attendee didn’t receive your email:
Under Message Details, you can view the email text that was sent. Click Message Analytics to view the list of email addresses to whom the invite was sent and check for any emails that were not delivered. If you are a Gold, Platinum or Enterprise subscriber, you can see which invitees opened your email and clicked the sign up link.
Use these messaging features to power your planning, so you can save time and ensure a positive experience for your group.